Gone are the days when film rolls were limited and you just could click limited pictures with limited capacity. Now it’s all about high pixel cameras and amazing DSLRs which allow you to click multiple photos in multiple modes which later can also be edited. This in turn results in numerous duplicate photos.
So the next question comes how to fix duplicate photos. Yes, you have the chance to delete them manually by searching the images in different folders, spending a lot of precious time in vain. And the other way is to directly install a duplicate photo finder which can immediately scan out the duplicate photos from the whole computer and help you get them deleted instantly.
So which is the best duplicate photo finder for Windows 11 users and how can they delete duplicate photos hidden within the system? Let’s check them out.
Duplicate Photos Fixer Pro for Windows 11
With its name rising and shining in the field of duplicate photos, this is certainly the best duplicate photo finder you can go through. What is more exciting about this tool is that it has a faster scanning engine, straightforward interface, multiple scanning modes, and number of filters to decide which photos shall stay back and which needs to be deleted.
Before we give you more information about Duplicate Photos Fixer Pro, let’s just go through how to fix duplicate photos in Windows 11 easily.
Use Duplicate Photos Fixer Pro
The whole process definitely starts with downloading and installing Duplicate Photos Fixer Pro on your computer. Note that you can even download this tool on Android phones for deleting duplicate photos.
Step 1: Launch Duplicate Photos Fixer Pro on your computer.
Step 2: Click the ‘Add Photos' or ‘Add Folder’ option in order to add the files easily. Alternatively, you can add photos or folders by dragging them into the interface.

Step 3: When added, click the
‘Scan For Duplicates’ button below and the scanning process will begin
immediately.
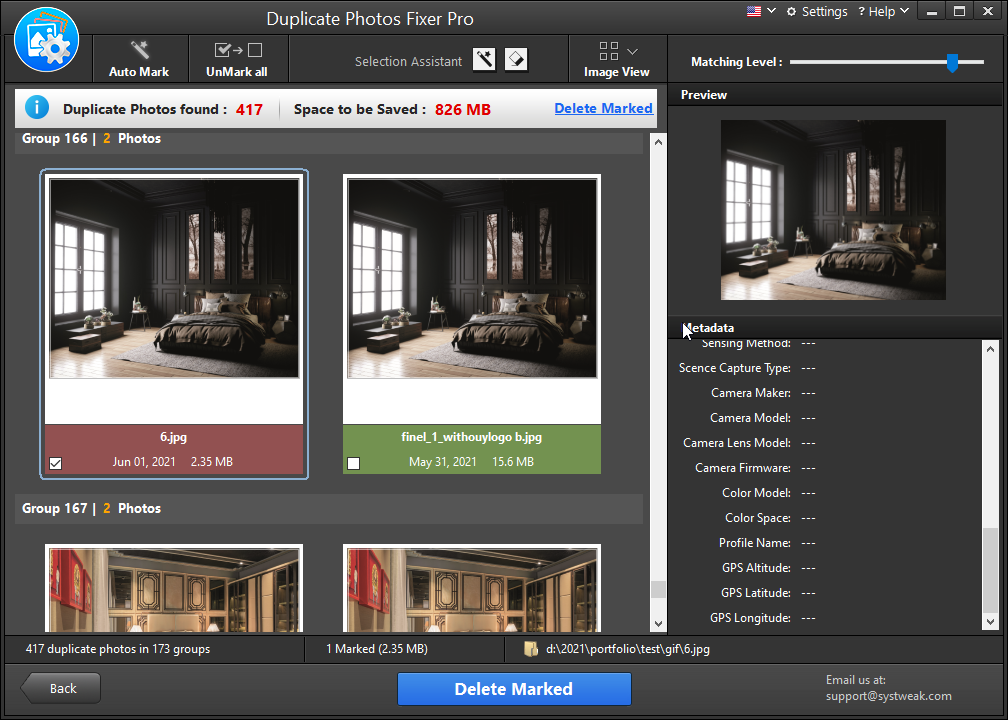
Step 4: As and when the scanning process is done, you get a complete
preview of the duplicate images along with the original ones on the screen.
Step 5: Now you have both options. You can select the duplicate photos one by one or just use the auto-mark button to delete all the duplicate photos at once. Although the preview option is capable of giving you all the available duplicate images which make it easier for you to decide.

Step 6: Once done, click ‘Delete marked’ from the bottom and you can surely reclaim a lot of space back in your system.
That’s it. This is how you can fix duplicate photos in Windows 11 as easily as thought. A few clicks and it's done.
So what are other features that you can use with Duplicate Photos Fixer Pro? Let’s figure them out here.
1. Comparison modes:
There are two different comparison modes available here which include Exact
match and Similar match. The exact match brings those images in pictures that are
exactly the same. Usually, the pictures under this section are a little low.
Another one is a Similar match which helps in detecting near-identical and
similar images after the proper scan.
2.
Changing levels:
There is a bar for matching level, bitmap size, time interval, and GPS which
could be set up according to your choice and the amount of matching level required.
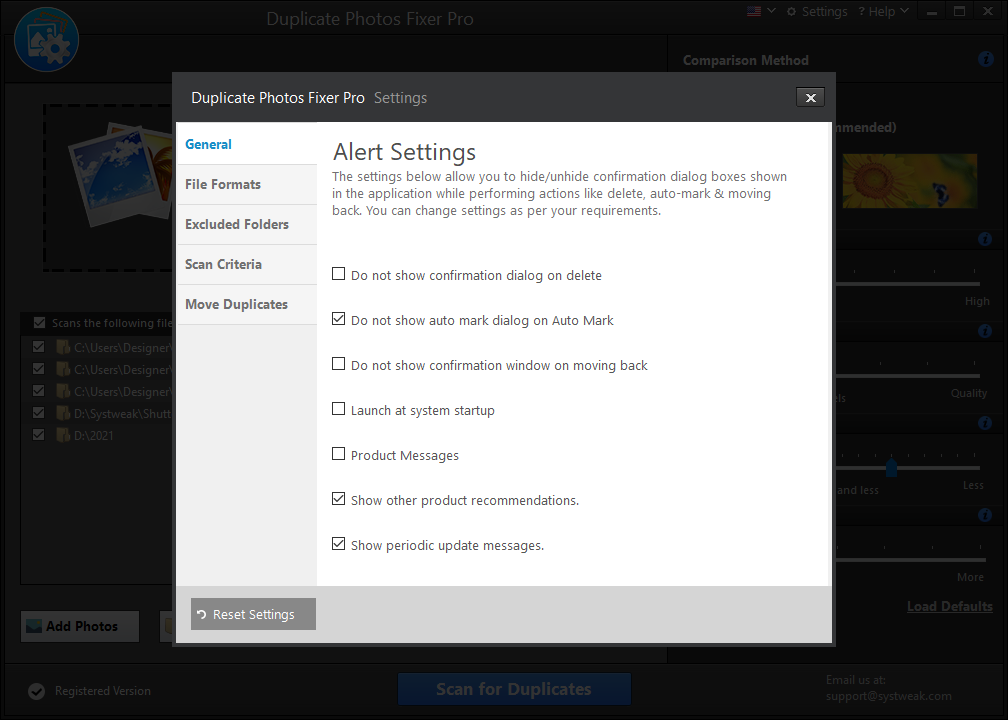
3. Settings: There are numerous settings available on the screen which allow users to access duplicate images at a different level.

● General:
This holds alert settings using which you can mark or unmark different
criteria for performing actions.
●
File
formats: Choose the file format which you want to be scanned within the tool.
●
Excluded
folders: This section includes those folders that you don’t want to be scanned
and keep in a safe space for goodness.
● Scan
criteria: It helps the users to select image file extensions. For example, the
option of minimum file size is set as 50kb by default and it can be changed.
Moreover, the data storage unit can also be changed from KB to MB.
Wrap Up
We hope that you have found out how to fix duplicate photos in Windows 11 and why Duplicate Photos Fixer Pro is a good option for all. Have you tried using this tool yet? What are your suggestions and reviews about the tool? Share them with us in the comments below and let us know if you would like to recommend this tool to others.


If you have any doubt related this post, let me know